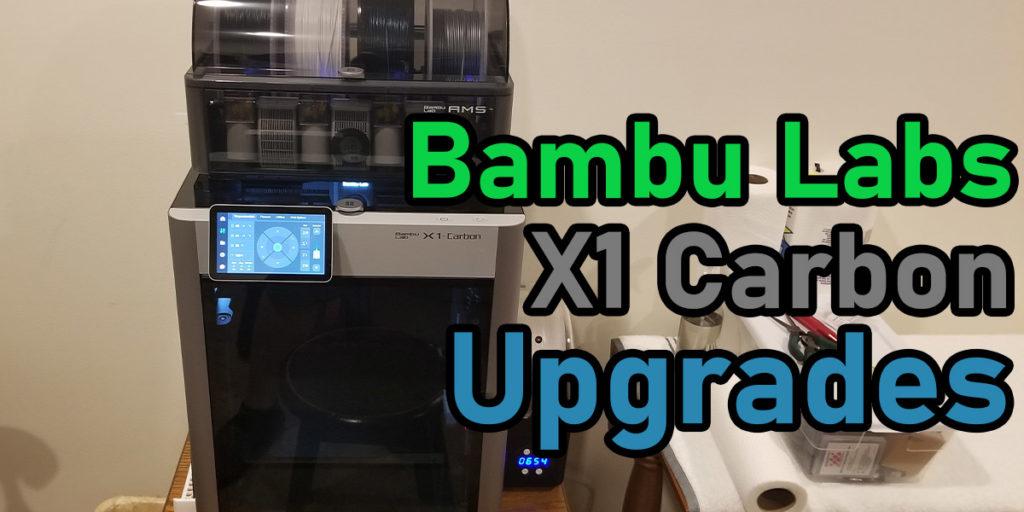
Did you just get a new Bambu Lab X1 Carbon and are now looking for the best Bambu X1C upgrades? I just recently made the switch from an Ender 3 Pro to the light-years ahead, X1 Carbon and couldn’t be happier. Naturally, as a lifelong tinkerer, the first thing I did was find, print, and install the best Bambu X1C upgrades I could.
Follow along as we detail some of the best Bambu X1C upgrades. Most of these Bambu Lab X1 Carbon upgrades are freely available that you can download and print right away. Along with the X1 Carbon upgrades for the printer itself, we will also discuss some awesome AMS upgrades that will up your printing game! Let’s jump right into it.
Table of Contents
This post contains affiliate links, which means I may receive a small commission, at zero cost to you, if you make a purchase through a link.
Bambu X1C Upgrades
Just like most other 3D printers, the Bambu Lab X1 Carbon can be upgraded with huge QoL (quality of life) improvements. Most of these are done by simply printing out upgrade parts for it and slapping them on your X1C. A few of the upgrades do require additional parts such as magnets, threaded inserts, etc. I will be sure to mention the parts I specifically used for each of the X1 Carbon upgrades in its description.
Along with the extra parts, quite a few of these upgrades need a variety of different M3 bolts. If you are in need of some M3 bolts, this M3 Bolt Starter Kit is highly rated and very affordable.
The kit contains all sorts of different M3 bolts and has every single type of M3 bolt you will need for these Bambu Lab X1C upgrades.
All of the upgrades mentioned below have been printed and installed on my machine. When initially purchasing my Bambu Lab X1 Carbon, I got a spool of their silver ABS and dedicated that spool as my ‘X1C Upgrades Spool’, so nearly all of these parts were printed using that ABS. I will also call out any special printing requirements, such as layer height, supports, etc. for each upgrade.
Bambu Lab X1 Carbon Upgrades for the Printer
Here we will be discussing all of the Bambu X1C upgrades for the printer itself. Aside from the PEI plate, everything on this list can be downloaded and printed for free. Any additional parts will be highlighted so you know exactly what you’ll need. The first of many Bambu Lab X1 Carbon upgrades is a PEI build plate.
1. PEI Build Plate
The best of all of the Bambu X1C upgrades is probably the most important QoL improvement you can make. That would be using a PEI build plate. One of the downsides with using a Bambu Lab printer is that they recommend using glue with their Cool & Engineering plates. Uhhh, no thank you.
What year is this, 2012!? While they mostly recommend glue on their plates as more of a release agent rather than a sticking agent, using a PEI sheet should eliminate that need completely, regardless.
You can find off-brand PEI plates or go with official PEI build plates. Bambu offers a smooth surface PEI plate they have dubbed the ‘High Temperature Plate‘ in addition to a textured surface PEI plate, appropriately called the ‘Textured PEI Plate‘. Both of these plates are great, but they are a bit pricey, especially if you want to get them both.
Alternatively, you could find an off-brand plate that has a smooth surface on one side and the textured surface on the other side for a fraction of the price. I personally use the pictured double side PEI plate as it gives me exactly that, a smooth and a textured surface in one plate! In fact, that plate is my go-to and my daily driver, if you will.
You will need to tinker with each filament’s bed temperature to find that sweet spot so the part adheres well. For example, ABS needs to be 100c on my machine for it to stick on the PEI plates. This applies for both the official PEI build plates or off-brand PEI build plates.
2. Y-Splitter
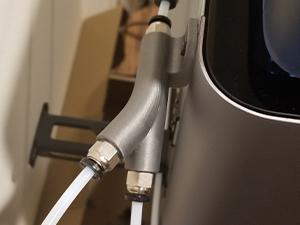
Now that the build plate has been taken care of, the rest of the Bambu Lab X1 Carbon upgrades are going to focus on printed parts you can download and make for free! The first one is the Y-Splitter. If you have an AMS, this upgrade will save you a ton of time should you ever need to print from the spool holder on the back of the machine.
As you may or may not know, certain filaments are not usable in the AMS and require you to use the single-spool-holder on the back of the X1 Carbon. A great example of this TPU filaments. Typically, you would need to disconnect the tubing from the AMS and feed you filament through the now open connector on the back of the machine.
That is where this handy y-splitter comes into play. Disconnecting the AMS will no longer be a concern after installing this. You will need some extra PTFE tubing for this upgrade. Your X1C should have come with some spare tubing, but if yours did not or you’ve already used it, this PTFE tubing works great.
Finally, you will need 3x PC4-M10 Pneumatic Fittings for the Y-Splitter. Be sure to use the model named “Y_Splitter_PC4-M10_V2_rw.stl” when printing. For what its worth, I printed mine at 0.08mm layer height, standing up without supports and it turned out perfect!
| Bambu X1C Upgrades – Y-Splitter | Creator | Additional Parts Required? | Effort/Skill Level |
|---|---|---|---|
| Y-Splitter | HaraldGeisler | Yes, 1-2 (read above) | Minimal |
3. Bento Box (Fume/VOC Air Filtration)
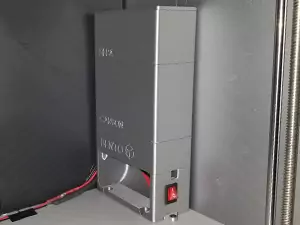
Out of all of the Bambu Lab X1 Carbon upgrades, I think this is the most beneficial. If you plan to print with materials that give off fumes and/or produce VOCs (volatile organic compounds), such as ABS or ASA for example, you will definitely want the Bento Box. The Bento Box is essentially an air purifier that removes as many fumes and VOCs as possible from your printer’s chamber.
It works by sucking air in from the top and blowing out it at the bottom. Along this trail, the air will pass through a HEPA (high efficiency particulate air) filter and then carbon pellets. These two layers will greatly reduce the fumes and VOCs from your ‘nasty’ printing materials.
I printed mine with an on/off switch so I don’t have to plug and unplug it in every time I want to use it. If you plan to go this route as well, you will need to also download the Bento Box V2 Switch Remix (linked below). This X1 Carbon upgrade might seem daunting at first, but it really isn’t too bad.
The author of this upgrade has put together a wonderful PDF with build instructions. Just be aware, there are a bunch of additional parts you will need to fully build this. Here are exactly the same parts I used to build mine:
- 4020 Fans
- 24v Power Supply (comes with the DC jack you’ll need as well which is nice)
- 4x2mm Neodymium Magnets
- Heat Set Threaded Inserts
- Acid-Free Activated Carbon Pellets (according to the seller, this is acid-free, even though it is not in the title or description)
- HEPA Filters
- 3-Way Rocker Switch (optional unless you use the Bento Box V2 Switch Remix like I did)
- 4x M3 X 25mm bolts (see above)
- 1x M3 X 6mm bolt (see above)
Depending on how you wire your Bento Box up and how you plan to route the cables, you may also need some extra lengths of wire. Alternatively, the creator of this upgrade has a link in the Printable’s description where you can purchase a semi-assembled kit with everything all printed out and any parts you’ll need to get this up and running.
If you do end up building this upgrade and are financially able to, consider donating to the author via his PayPal or Ko-Fi link (at the end of the Printable’s description). Design-wise, this is a very intricate upgrade and I cannot even imagine the amount of hours it took to come up with the final designs.
| Bambu X1C Upgrades – Bento Box | Creator | Additional Parts Required? | Effort/Skill Level |
|---|---|---|---|
| Bento Box | thrutheframe | Yes, many (read above) | Moderate |
| Bento Box V2 Switch Remix | gniticxe | N/A | N/A |
4. Top Glass Lid Riser
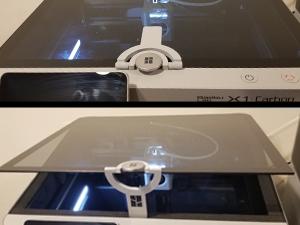
Out of all the Bambu Lab X1C upgrades, I think this might be the coolest, design-wise! This is a print-in-place hinged lid riser that snaps onto the lid’s handle and flips in place to prop the lid open.
Prior to printing this upgrade, I was just leaving the front door open. Well, not anymore! If you’re printing any PLA, then this is a must have upgrade since Bambu recommends some ventilation.
The original designer of this upgrade is Chester3D, but I opted for a longer version that raises the lid a bit more than the original model. As you can see from the photo, you can use this for both keeping the lid propped open, or completely closed without have to remove it.
| Bambu X1C Upgrades – Glass Lid Riser | Creator | Additional Parts Required? | Effort/Skill Level |
|---|---|---|---|
| Top Glass Lid Riser Remix | FrancescoM | N/A | Minimal |
5. Trash Ramp
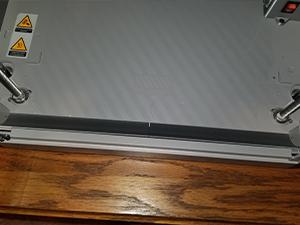
This is one of the simplest Bambu Lab X1C upgrades on the list. It is a little ramp that connects on the bottom door lip for easily removing any trash that accumulates on your printer’s floor. You can download the .3mf and the ramp pieces already oriented on the build surface with a brim for easy printing.
After mine was done printing and I did a quick test fit, I opted to use a small bit of superglue to permanently bond the two pieces together. This is probably overkill and by no means required, but it does feel a bit more solid once the glue has set.
| Bambu X1C Upgrades – Filapoop Scoop | Creator | Additional Parts Required? | Effort/Skill Level |
|---|---|---|---|
| Filapoop Scoop Base Insert | GuyH | Optional, 1 (read above) | Minimal |
6. ShortStack (PTFE Tube Guide)
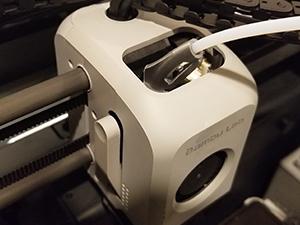
The ShortStack is another one of the easier Bambu Lab X1C upgrades on this list. You print it out and attach it to the printer, then you’re done! The entire purpose of this upgrade is to allow the PTFE tube to bend gracefully into the hotend to give the filament a smoother ride down the chute. This prevents possible sharp angels from PTFE tube where the filament can get caught and cause jams.
You can opt to download the .3mf file and the part will already be positioned on the build plate with a brim for easy printing. The author of this upgrade recommends printing at 0.16mm layer height. I printed mine at this resolution and it came out looking real good and functions perfectly.
| Bambu X1C Upgrades – ShortStack | Creator | Additional Parts Required? | Effort/Skill Level |
|---|---|---|---|
| ShortStack PTFE Tube Guide | AdamL | No | Minimal |
7. Corner Plate Guide (The Shifty)
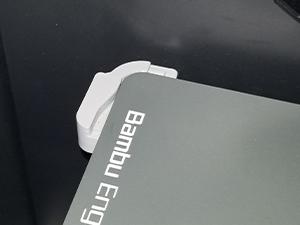
This corner plate guide, named The Shifty, is one of the easiest upgrades on this whole list. It is a quick print and uses very little filament. The whole idea behind this is to make placing a plate on your bed a simple matter.
With this installed, you just put your plate on and never need to worry if it is positioned correctly or not. This guide will handle that for you!
Once the print is complete, it is as simple as removing the minimal supports and attaching it. All you need to do is clip/snap it on the left side of your printer’s bed and you’re all set. For printing it, there are print profiles with supports enabled for most filament types.
I would highly recommend printing this in PETG, ABS or ASA though. If you print it in PLA and attempt to print ABS, for example, the corner guide can warp and become deformed due to the ambient heat needed for advanced filament printing.
| Bambu X1C Upgrades – The Shifty | Creator | Additional Parts Required? | Effort/Skill Level |
|---|---|---|---|
| Corner Plate Guide | JDJDJD | No | Minimal |
8. A Scraper That Attaches to your X1C’s Door
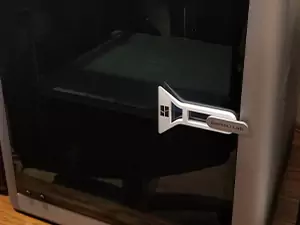
The final printer-specific Bambu Lab X1C upgrades is one that I actually made! You know that scraper that comes preinstalled on your printer? Well, I have taken that scraper and remixed it just a bit.
This new version is a bit larger. It is much easier to use and fits more comfortably in the hand. Also, it was designed to clip onto the printer’s door handle. There, it will have a permanent home and always be within an arm’s reach!
The last change I made is purely a cosmetic one. The top of the scraper has a subtle Bambu Lab logo on it. Don’t worry if that’s not your thing, as it is a separate object. If you don’t want the logo on your scraper, you can simple delete the object and print the scraper plain!
| Bambu X1C Upgrades – Door Scraper | Creator | Additional Parts Required? | Effort/Skill Level |
|---|---|---|---|
| Door Handle Scraper | TheMakerSphere | No | Minimal |
Bambu Lab X1C Upgrades for the AMS
These are all of the Bambu Lab X1 Carbon upgrades for the AMS. The first series of upgrades revolve around creating a dry environment within your AMS to keep your filaments dry and from absorbing extra moisture. By keeping the humidity levels inside the AMS very low, your filaments won’t be able to re-hydrate.
1. AMS Dry Box
Before placing filaments into your AMS, it is recommended to dry them out prior to printing with them. Once they are dried, you want them to remain dry. That is where a dry box is handy. A dry box is an environment where the humidity levels are very low, and that is our goal for the AMS. Each one of these Bambu X1 Carbon upgrades for the AMS will need some Silica Gel Beads to go into them.
These silica gel beads are great as they are reusable. Once they are full of moisture, they change color, turning purple, and can then be microwaved to ‘recharge’ them. This will zap all of the moisture from the beads, returning them to their blue color. The nice thing about this pack is that it comes with 1lbs of silica gel beads, which is plenty for our usage!
AMS Dry Pods
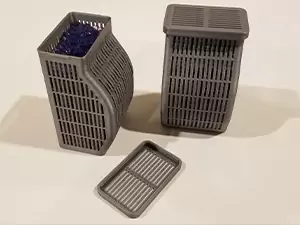
The AMS dry pods are some of the most clever Bambu X1 Carbon upgrades you can print yourself. They are containers that hold the previously mentioned silica gel beads and absorb moisture. The slot in the front of the AMS perfectly. You can see the photo below which shows all three of mine sitting inside of the AMS.
To print these out, just auto orient and auto arrange the two boxes and two lids. I printed mine at the standard 0.20mm layer height and they came out beautifully. Once they are done printing, just fill them up with the silica gel beads and snap the lid on. Place them inside the AMS and you’re done!
| Bambu X1C Upgrades – AMS Dry Pods | Creator | Additional Parts Required? | Effort/Skill Level |
|---|---|---|---|
| Dry Pod | dietrich | Yes, 1 (read above) | Minimal |
An AMS Dry Pod with a Hygrometer
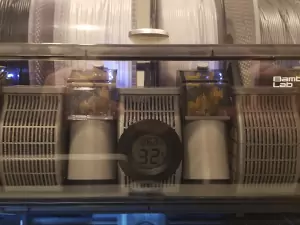
The next of the Bambu Lab X1C upgrades for an AMS dry box is the exact same dry pod as above, except this one has a space dedicated to a hygrometer to tell you the temperature and humidity levels inside the AMS. If you don’t care about seeing those readings, instead print a third regular dry pod from above.
The specific hygrometer needed for this dry pod is a Circular Mini Hygrometer Thermometer. The hygrometer sits snugly in the dry pod and is also easy to remove so you can change the hygrometer’s battery when it dies. You will need to add supports on the outside of the dry pod for the hygrometer’s cavity at the top. Other than that, set a 0.20mm layer height and you’re good to go.
| Bambu X1C Upgrades – AMS Dry Pod w/Hygrometer | Creator | Additional Parts Required? | Effort/Skill Level |
|---|---|---|---|
| Dry Pod w/Hygrometer | MediaMan3D | Yes, 2 (read above) | Minimal |
AMS Silica Trays
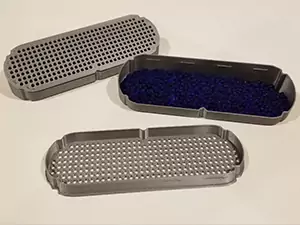
The last of the Bambu Lab X1 Carbon upgrades for the AMS dry box are these silica trays. Similar to the dry pods, these are containers to hold the previously mentioned silica gel beads. These trays go inside the AMS where the packs of desiccant go – the trays with the removable doors on the left and right, beneath the filament spools.
After I printed these, they fit very snugly inside my AMS. In fact, I could not get the tray doors to go back on once these were seated. But that is not a huge deal for me. I just took the removable doors and stored them in my parts and tools bin and haven’t thought about them since.
| Bambu X1C Upgrades – AMS Silica Trays | Creator | Additional Parts Required? | Effort/Skill Level |
|---|---|---|---|
| Silica Trays | MartinSpajaard | Yes, 1 (read above) | Minimal |
2. The SENATE (AMS Feeder Buttons)
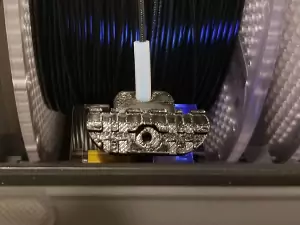
Another one of the Bambu X1C upgrades for the AMS are these AMS feeder buttons called The SENATE. In a nutshell, they are button covers that have a much larger grip to make pushing them easier. Also, each one requires a 20mm length of PTFE tube. The reason for this is to assist the filament through the AMS, and more importantly, prevent the existing buttons from getting worn down from filaments sliding over it.
This is especially true for filaments with abrasive particles in them, such as any Carbon Fiber infused filament. The instructions call for these to be printed at 0.16mm layer height and to auto orient and auto arrange them on the build plate. Doing that should not require any brims or supports. For the time being, I also used some superglue to attach the grip to the button. I plan to screw some M3 X 4mm bolts at some point.
| Bambu X1C Upgrades – The SENATE | Creator | Additional Parts Required? | Effort/Skill Level |
|---|---|---|---|
| The SENATE | OurAngryBadger | Yes, 1-2 (read above) | Minimal |
Other Upgrades & Essentials
Now that the actual printer and AMS unit have been upgraded, we can move on to the ‘other’ things. The following Bambu X1 Carbon upgrades are not for the printer or the AMS unit, but rather extras and tools. Everything mentioned below, minus the build plate holder, are absolute essentials in my book. The first essential is a filament dryer.
1. Filament Dryer
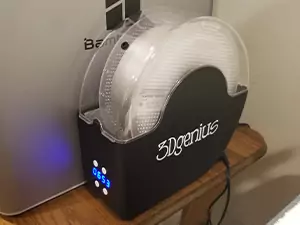
While a filament dryer is not specifically a Bambu X1 Carbon upgrade, it is an essential tool for any 3D printing hobbyist. Let me tell you, when I was using my Ender 3 Pro, I almost exclusively printed in PLA. I never worried about wet filament.
But with the X1 Carbon, I was having all sorts of issues printing my PETG and ABS when I first got it. My prints had blobs all over them, uneven layers, major adhesion issues. Any issue you can think of, I was experiencing them.
As it turns out, those filaments were just very wet. Once I started drying my filaments, the issues I was having just vanished, literally. Now, anytime I get a new spool, it goes into the filament dryer for at least 8 hours. I really like this 3Dgenius Filament Dryer.
The dryer’s heater can range from 45c up to 70c and it has a timer you can set from 1 hour all the way up to 36 hours. On top of the heater, it also has a built in fan that continuously circulates the air inside of it. A lot of dryers only have the heaters with without the fan.
Honestly, there are really only two downsides. The first being that it can only hold a single spool at a time. The second downside is that this unit is pretty loud – mainly from the fan. Now, I don’t sleep in the room my X1C lives in so the noise doesn’t bother me, but it may bother some, so just be forewarned. But really, the fan is one of the main reasons I settled on this model over other models, so yeah.
2. AMS Disconnect Tool
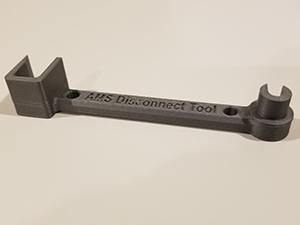
The first of the Bambu Lab X1 Carbon upgrades for tools is the AMS Disconnect Tool. For some odd reason, Bambu made it next to impossible to disconnect the AMS from your printer. The release button for the PTFE tube is recessed, making the release incredibly hard to reach. Also, the pin connectors have a latch on them that needs to be pressed in order to remove them from the printer. Those latches are facing the printer instead of facing outwards, leaving no room to press them.
That is where the AMS Disconnect Tool comes into play. Each end of the tool is designed for one of those issues. The round end is for triggering the PTFE tube release and the square end is for sliding over the pin connectors to engage their latch releases. Without this tool, you risk damaging your printer and AMS.
| Bambu X1C Upgrades – AMS Disconnect Tool | Creator | Additional Parts Required? | Effort/Skill Level |
|---|---|---|---|
| AMS Disconnect Tool | Jody | No | Minimal |
3. Extruder Gear Removal Tool
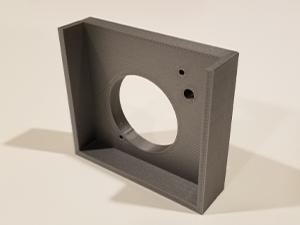
The next of the Bambu X1C upgrades for tools is an Extruder Gear Removal Tool. I’ll be honest, I have not needed this, but everywhere I go, I see this mentioned as an essential. The takeaway I have learned from all of this is to print the tool and keep it stashed away for when you do need it. Better safe than sorry.
Long story short, if you have a clogged extruder, you will need to punch out the main gear without damaging anything so you have access to the stuck filament. That is where this tool is used. It is basically a jig to sit the extruder on so you can safely remove the main gear. This How to Fix an Extruder Clog video shows the tool in action.
| Bambu X1C Upgrades – Extruder Gear Removal Tool | Creator | Additional Parts Required? | Effort/Skill Level |
|---|---|---|---|
| Extruder Gear Removal Tool | How2Texan | No | Minimal |
4. Screw Scrubber
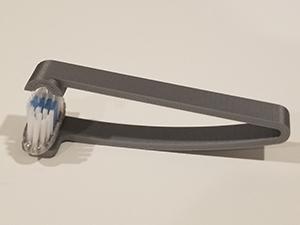
The last of the Bambu Lab X1C upgrades for tools is a really cool screw scrubber. One side is threaded to match the threaded rods of the printer, and the other side is flat. The flat side is meant for super gluing a tooth brush head to it.
If you print it at the author’s recommended layer height, 0.08mm, it should glide up and down the threaded rods with ease as you raise and lower the bed. To assemble it, you just need to snap off or cut off the head of a tooth brush and glue it on to the scrubber frame.
| Bambu X1C Upgrades – Screw Scrubber | Creator | Additional Parts Required? | Effort/Skill Level |
|---|---|---|---|
| Super Screw Scrubber | AdamL | Yes, 1 (read above) | Minimal |
5. Plate Holder
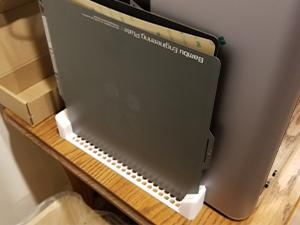
While this is up to personal taste, I feel like a plate holder is one of the most essential Bambu Lab X1 Carbon upgrades. It offers a nice place to store any plates that are not currently being used and makes them very accessible.
One thing that would make this upgrade better is to add some rubberized anti-slip feet to the bottom. The holder is very lightweight and when taking or placing plates on it, it slides all over the place. Other than that, this is a very functional upgrade that I keep on the left side of my printer.
| Bambu X1C Upgrades – Plate Holder | Creator | Additional Parts Required? | Effort/Skill Level |
|---|---|---|---|
| Plate Holder | Alvin Pan | Optional, 1 (read above) | Minimal |
Bonus: What About X1C Upgrades for Organization?
If you’re anything like me, your 3D printing space is not always the most tidy area in your home. Be it spare parts, tools, filament, empty spools, etc. strewn about, cluttering up your workspace. Well, that is where this Bambu Lab themed organization system comes into play, the BaBo System.
The BaBo System is the biggest and most time consuming of all the Bambu X1C upgrades in the on this list. But it is so worth it in my opinion. Here I will give a very brief overview of this organization system. For more details and an in-depth review, take a look at The Ultimate Bambu Lab Storage Box page.
The BaBo Organization System
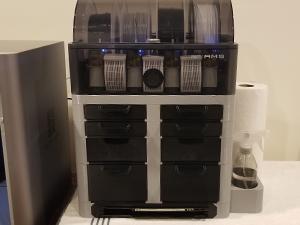
The BaBo System is a modular organization box for storing all of your 3D printing tools, accessories, hardware and spare parts. As you can see from the photo, the design is based off of the X1 Carbon’s design and is very sleek looking.
What you do is build the system from many different moduls, as they are called. Then, within each of the moduls, you add dedicated inserts for your parts and tools. Sort of like how Gridfinity works.
Now all of your Bambu Lab spare parts, tools and other accessories have a permanent home to reside in! There are many different configurations and versions of all the parts available so you can customize it to your heart’s content. See all about it at The BaBo System.
Final Thoughts
These are what I feel are the most beneficial and best Bambu X1 Carbon upgrades you can install to get the most out of your printer. To summarize, we discussed the best Bambu Lab X1C upgrades for the printer itself. Then we reviewed the essential Bambu X1 Carbon upgrades for the AMS unit. Finally, we went over some great Bambu Lab X1 Carbon upgrades for tools and other non-printer-related items.
I hope this article has given you a few good ideas for upgrading your X1 Carbon. Sound off in the comments. Let me know which upgrades you like the best. Also feel free to provide some of your favorite Bambu Lab X1C upgrades that are not mentioned here. Heck, take a few photos and share you entire setup to let the world see! Thanks for reading and happy printing!
You May Also Enjoy










Leave a Reply