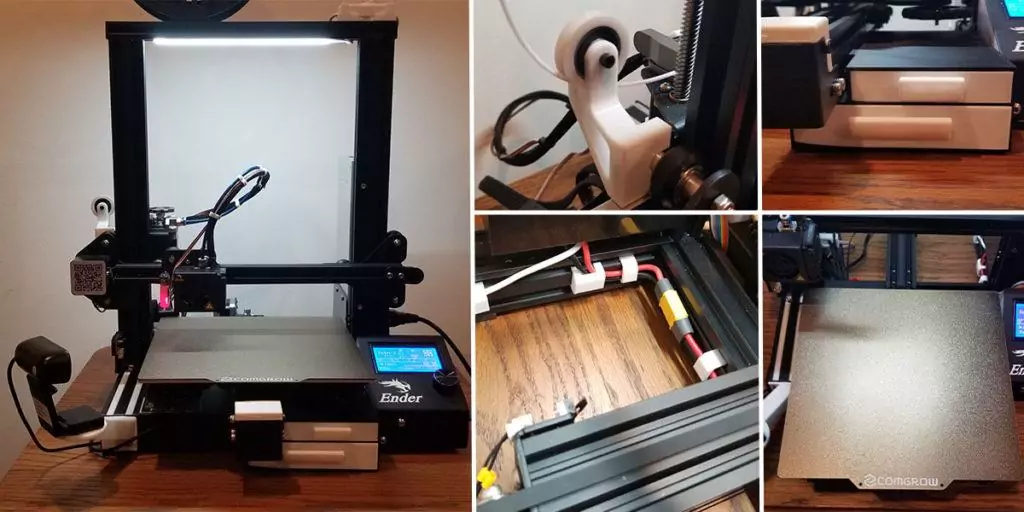
The best Ender 3 upgrades are a combination of both free and purchased upgrades. The best ones are not necessarily purchased upgrades. Yes, there are a ton of neat upgrades you can purchase to make your Ender 3 even better. But there are also a fair amount of upgrades you can just download and print yourself, free of charge! And who doesn’t love free?
I have done quite a few Ender 3 upgrades since I initially got my 3D printer. I have printed my own free upgrades and also spent a few bucks to get some official upgrades. My goal is to focus on practicality and functionality to get the most out of my printer. Follow along as I detail all the best Ender 3 upgrades that I have installed, and that you should install too!
Table of Contents
This post contains affiliate links, which means I may receive a small commission, at zero cost to you, if you make a purchase through a link.
The 3D Printing Bug
As a person who likes to tinker and mess around with things, it was inevitable. I ended up getting the 3D printing bug. After researching, I decided on purchasing an Ender 3 Pro 3D printer for myself. Like many new 3D printing enthusiasts after their first purchase, I started digging into what Ender 3 upgrades I could get to make my printer better and more efficient.
To my surprise, there was a decent amount of high quality upgrades I could literally print on my machine, for my machine. Without any knowledge on the subject prior to researching, I figured the only upgrades were ones that had to be purchased.
While there are a ton of upgrades you can, and probably should purchase, there are also a ton of great free ones. Honestly, I am convinced that most people buy 3D printers just so they can upgrade their 3D printers. Its a sickness, and one I fully embrace!
Why Upgrade Your 3D Printer?
The Creality Ender 3 is a pretty good printer out of the box, stock. Once you have leveled your bed, you will be able to start printing right away. And if it is your first time using a 3D printer, guaranteed, you will be blown away with the results. But that right there is the problem, the bed leveling…
It took me forever trying to get my bed leveled the first time I used my 3D printer. I had many, many failed prints because my first layer was just not right. I watched videos and did the paper trick, but still struggled, and struggled hard.
I’d say the biggest factor for upgrading your Ender 3 is to make your life easier. Especially when it comes to bed leveling. Other reasons for installing upgrades is the improve your print quality. Additionally increasing your print speeds so your printed pieces take less time to print.
Also, you cannot forget about aesthetic changes to give your printer a fresh vibe. All the Ender 3 upgrades discussed below have been installed on my personal machine and used pretty extensively.
Ender 3 Upgrades: Purchased Upgrades
Once I started printing some Ender 3 Upgrades, I began thinking about what I wanted out of my printer. I wanted more functionality and quality of life improvements. I had a couple of main categories I wanted to address. I wanted my bed to be easier to level and stay leveled longer.
Additionally, I was looking for a way to monitor my prints without having to be in the same room. Lastly, I wanted to upgrade some of the stock parts with much higher quality parts. This way they don’t wear out as fast. I started with bed leveling first.
Bed Leveling Ender 3 Upgrades
When it comes to the best Ender 3 upgrades, bed leveling-related upgrades are at the top of the list. These upgrades will make your life, in terms of 3D printer, much easier. As a result, you will have an overall better experience, too!
CR Touch
The first, and probably most impactful Ender 3 upgrade you can make is to install a CR Touch. This device will greatly assist with bed leveling. It has a probe that will actually probe the bed in multiple spots to determine low points and high points in your bed’s surface.
The device will then account for those points and auto-correct as the printer prints. This should make leveling your bed less of a chore and give you more overall precision. Out of all the Ender 3 upgrades, this really is a must have.
Silicon Spring Mounts
The next of the Ender 3 upgrades for bed leveling are Silicon Spring Replacement Mounts. These silicon ‘springs’ replace the flimsy metal springs that come stock on the Ender 3’s bed. The purpose of these silicon mounts is to be stiffer than the stock springs when tightening the bed leveling wheels.
This will allow the bed to stay level for a lot longer. The stock springs have a lot of give & flex in them and cause the bed to become un-leveled at a much quicker rate overtime. This is due to all the vibration and jerking the printer does while actually printing.
Ender 3 Upgrades for the Build Surface
The next set of Ender 3 upgrades are for the build surface and heated bed. These upgrades will improve your success rate as the PEI plate will massively improve your print’s adhesion and the heated bed insulation sheet will keep your bed at the desired temperature.
PEI Spring Steel Plate
The first of the Ender 3 upgrades for the build surface is this AMAZING PEI Spring Steel Plate. This plate is so cool. Not only does the PEI coating make your prints stick like superglue, but the spring steel nature of it makes releasing prints incredibly easy as well. Literally all you have to do is flex the bed and your prints detach in an instant!
There are two different sides to this plate. One side is a textured side which will be imprinted on your print’s bottom surface, giving them the same textured feel. The other side of the plate is a smooth side which will make your print’s bottom surface super smooth.
HotBed Insulation Foam
You may have noticed that your Ender 3’s hotend/nozzle heats up rather quickly. On the other hand, the hotbed tends to take a while to heat up. That is where this Hotbed Insulation Foam comes in. The entire purpose of this Ender 3 upgrade is to keep the heat in your hotbed there and not let it escape.
This results in your hotbed getting up to temperature quicker, and keeping the temperature at its intended value. For materials such as PLA and PETG, that isn’t much of a concern. However, once you move to more advanced materials, such as ABS, this foam will be a game changer. That is because those types of materials require much higher hotbed temps.
Ender 3 Upgrades for Better Parts
These Ender 3 upgrades are all about giving you better parts. A really good example of this is replacing a plastic part with one that is made from metal. These will increase the part’s lifespan because they are made from better and stronger materials.
All Metal Extruder
One of the most common pitfalls with the Ender 3 is the stock extruder. The extruder that comes on a stock Ender 3 is bad, like really bad. It is made from plastic and will break and/or wear out. It is not a matter of if it will break, but when will it break. On my Ender 3 Pro, the extruder lasted about 7 months and then the plastic arm snapped right off one day.
This All Metal Extruder is made from aluminum rather plastic, as its name would suggest. This is honestly an upgrade worth making since it is relatively cheap and very high quality.
Capricorn PTFE Tubing
Another fantastic Ender 3 upgrade is replacing the stock PTFE tubing with some Capricorn PTFE Tubing. If you are planning to print with advanced filaments such as ABS, ASA, nylon, etc., this will be needed as it is resistant to temperatures up to 300c. In addition to the heat resistance, it boasts all sorts of other features as well.
Capricorn PTFE tubing is corrosion resistance, pressure and wear resistance, aging resistance, radiation resistance, low permeability, long-term exposure, and no deformation in the atmosphere. Lastly, installing this upgrade is a breeze as all you will have to do is disconnect the old tubing and slip this one in its place.
LED Kit
One of my personal favorite Ender 3 upgrades I’ve installed is this LED Kit. If you have a camera to remotely monitor your printer, you will want to install this on your machine. No longer worry about having to leave the lights on in the room your Ender 3 is in. Just turn these bad boys on and you’re golden.
Surprisingly, this is a simple installation too. No need to solder or splice wires. You will actually connect the wires to unused terminals on the Ender 3’s power supply. You will need to download and print the following LED Switch Bracket File to attach the wiring (and switch) to your printer.
OctoPrint is One of the Most Significant Ender 3 Upgrades
I ended up using a Raspberry Pi alternative called the Le Potato to setup and install OctoPrint for my Ender 3 Pro. If you’re interested in having OctoPrint installed on your Ender 3, check out my OctoPrint Setup on Ender 3 guide.
- Le Potato: the SBC that runs Ubuntu which OctoPrint is installed to
- Generic USB Camera: The camera I use to monitor my prints using OctoPrint
Ender 3 Upgrades: Free Printable Upgrades
After figuring out how to tram (level) my bed and doing a couple of test prints, I started immediately scouring all the 3D printing sites such as Thingiverse for some Ender 3 upgrades. The first upgrade I printed was this Y-Axis Rail Cover.
I saw it in a video and wanted to try it out. To be honest, it doesn’t really do anything. It is mainly cosmetic. But it was the first successful ‘upgrade’ I printed and it is still on my machine today. Plus, it does tie my whole black and white theme together a bit nicely.
Some of these free printable upgrades will require a bit of hardware. Mainly metric screws and skateboard bearings. I personally got a set of M3 Screws and M4 Screws since I didn’t have any lying around. Same goes for the skateboard bearings. So I ended up purchasing a set of these 608RS Bearings. With that said, in no particular order, free upgrades you can print yourself:
An Ender 3 Pro Upgrade for Storage
Dual Drawers
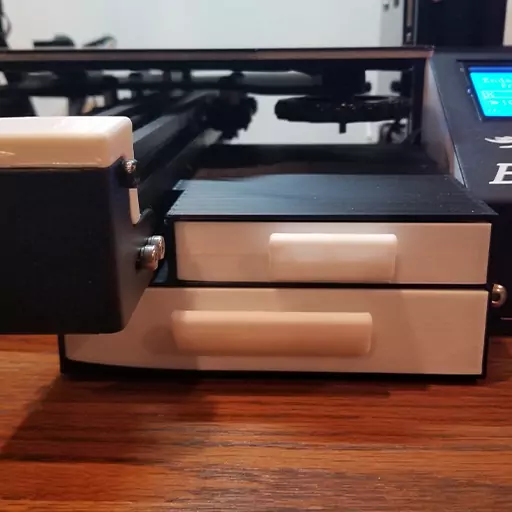
This Dual Drawer Ender 3 upgrade is specifically for the Pro models. But don’t worry, there are remixes for other Ender 3 models as well! I actually like this upgrade quite a bit. I store all of my spare parts and the tools that came with the printer in these drawers. You may want to use a brim on the drawers. As you can tell, I had a bit of warping on mine. Whoops!
As mentioned, this specific printed upgrade is for Ender 3 Pro models only. Here is one that is for base Ender 3 models: Ender 3 Base Mode Dual Drawers. Be sure to check the remixes for other non-Pro and non-base Ender 3 models.
Ender 3 Upgrades for the Frame and Added Functionality
Ender 3 Filament Guide
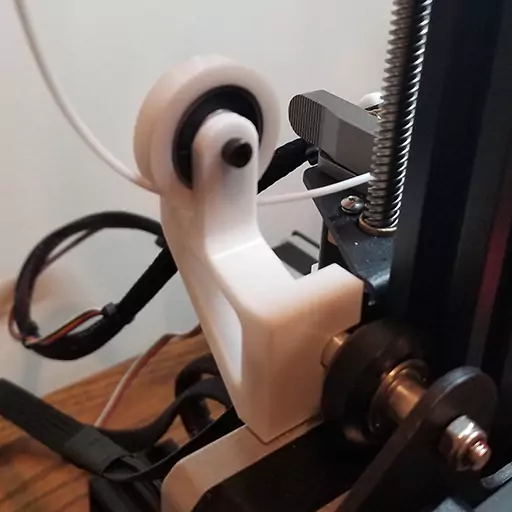
A great Ender 3 upgrade is this Filament Roller Guide. This is darn near a must have upgrade. The filament guide angles your filament so it doesn’t snag or snap and lets it move more freely to and through the extruder. It uses a 608RS bearing to allow the filament a buttery-smooth passage, while gently guiding the filament, as the name would imply.
Here are a couple other great Ender 3 upgrades that give you additional functionality and add to your overall printer’s aesthetics:
- V-Slot Covers: These are pieces that slide into the frame’s v-slots. They may only seem cosmetic, but these covers prevent debris and filament fragments from falling in the v-slots.
- Scraper Holder: This is a handy littler scrapper holder that slides into the frame’s v-slots to give your scrapper a dedicated home. I used this for a while and loved it. However, I ended up having to remove it because of the previously mentioned LED Kit which needed the v-slots this holder was using.
- Filament Spool Holder: The stock filament spool is okay. This one is much better. This is another Ender 3 upgrade that utilizes some of those 608RS bearings. These bearings allow the spool to turn much easier resulting in less friction. Also, since it is able to rotate more smoothly, it doesn’t make ‘that sound’ when the filament starts running low. If you know, you know (Cla-Chunk, Cla-Chunk, Cla-Chunk).
Cable Management Ender 3 Upgrades
The Ender 3 works just fine out of the box, but the cable management is lacking, to say the least. These upgrades will assist with that and really make your rig look clean and keep the cables out of the way.
Power Cable Clips
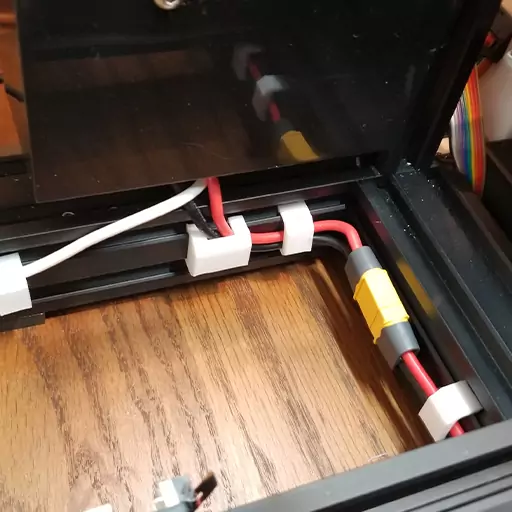
The first Ender 3 upgrades for cable management are these Power Cable Clips. The clips are great because they lift the power cable up and attach them to the frame instead of leaving them freestanding. They clip on to the frame’s v-slots very easily and are securely held in place with the lips on the clips (lol).
Main Cable Clips
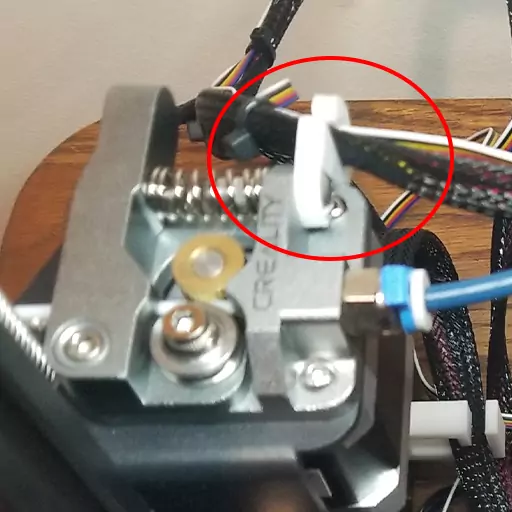
The next set of Ender 3 upgrades for cable management are a pair printable pieces to help keep the main cables out of the way. The first is an Extruder & X-Axis Cable Clips. This clip prevents the extruder and x-axis cables from getting caught on the buildplate as it moves by positioning the cables off to the side.
The other clip is a Hotend Cable Clip for All Metal Extruder (pictured). If you have upgraded to the all metal extruder, this is an excellent upgrade to install. The clip will keep your hotend’s cables secure while the x-axis moves back and forth so they are not flailing about.
Bowden Tube Cable Clips
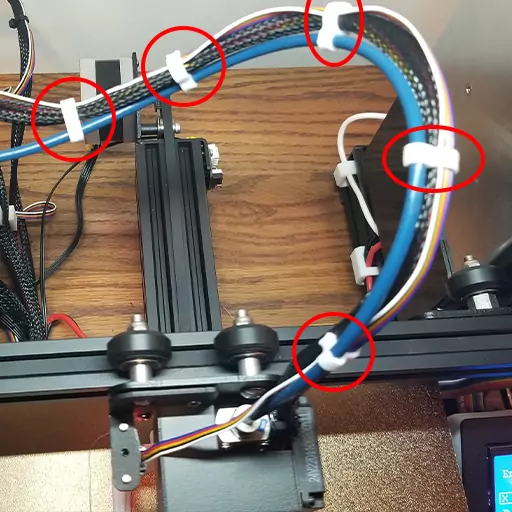
These Bowden Tube Cable Clips are rather clever little pieces. Print out a handful and they will keep your bowden tube and hotend wire bundle clipped together nicely. Easy peasy.
Free Ender 3 Upgrades for an OctoPrint Install
These are the upgrades I printed for my OctoPrint installation. I wanted my Le Potato board to be attached to the printer so if I had to move it, everything would move all at once. The same thing applies in regards to the USB camera as well. These are pretty nifty Ender 3 upgrades if you’re planning to have an OctoPrint instance running!
Le Potato Enclosure for Ender 3
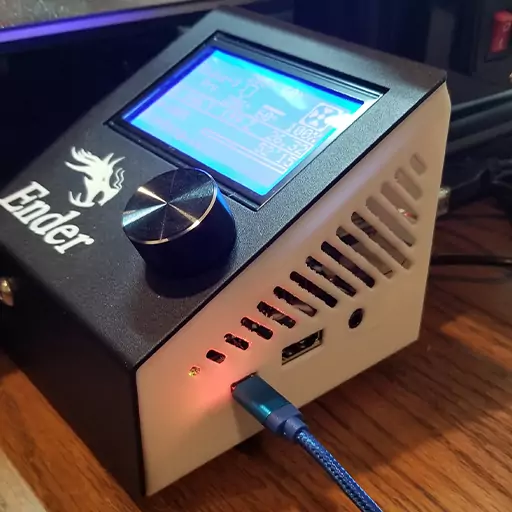
Attaching your OctoPrint board to your 3D printer means that where ever your printer goes, the board comes along for the ride. This LCD Enclosure for a Le Potato lets you use up otherwise unused space to put your Le Potato behind the LCD screen.
This specific model is a remix off of this Raspberry Pi LCD Enclosure with just some minor tweaks to accommodate the Le Potato perfectly.
Ender 3 OctoPrint Setup Camera Mount
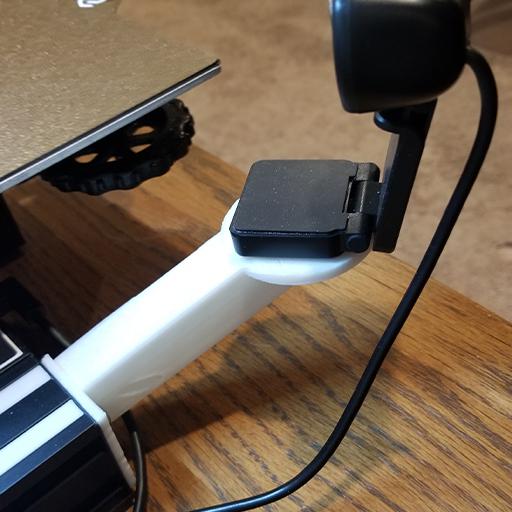
Simple enough, this Ender 3 upgrade is a bracket that attaches to the frame’s endcap and allows you to attach a camera to your printer. I really liked this Camera Mount it is a relatively easy print that has support for a 1/4 inch tripod mounting thread by feeding a 1/4 inch bolt through it.
Bonus Ender 3 Upgrades: Spare Parts
One thing to consider is having some spare parts on hand. For example, I have had to change the nozzle a few times and replace my hotend fan which completely died. I also had a really bad clog that required me to change the stock bowden tube and replace the silicon sock around the nozzle. The jam cooled and the plastic tore the silicon sock right down the middle. I now have about 20x or so spare nozzles on hand, 4x spare hotend fans and 3x spare silicon socks.
Extra Nozzles
Nozzles clog. It is a fact of life in 3D printing. Having some spare nozzles on hand will ensure you’re aren’t brought to a screeching halt when a clog does happen. Being able to quickly swap out nozzles and keep your printer’s downtime to a minimum is a wonderful feeling.
This 0.4mm Nozzle Set not only comes with 25 extra nozzles, but also a nozzle removing socket. With this socket, you won’t need to fiddle with the goofy wrenches to get your nozzle off as this just slips over the entire nozzle. There are also a couple of nozzle clearing needles and a pair of decent tweezers!
OEM Silicon Socks
There isn’t a whole lot to say about these Silicon Socks. They are genuine parts and come with 4x socks per unit. I have gone through a few of these as they do wear out over time. Having a few of these on hand will mean you can quickly replace a worn out one and get back to printing in no time!
Hotend Replacement Fans
I wish someone had told me to have a few spare Hotend Replacement Fans on hand. My hotend’s fan stopped working less than 6 months after purchasing my printer and had no extra fans lying around. I had to order the fans and wait for them to arrive before I could start printing again.
My printer was out of commission for 5 days because of that broken fan. Let my misery be your lesson here. This combo has 2x of both the hotend fan and the parts cooling fan, so you’ll be prepared ahead of time, unlike me!
Final Thoughts
There are tons and tons of upgrades you can make, but these are the Ender 3 upgrades that have worked for me. As you can see in the photo, every upgrade I have mentioned is installed on my printer and is currently in use. At the end of the day, determine what you are wanting out of your printer, and use upgrades to achieve that goal. Happy printing!
You May Also Enjoy








Leave a Reply