A common topic most Linux users search for at some point is “Linux Set Static IP.” Having a static IP address is almost mandatory for some applications such as any network IoT device, HTPCs, etc. There are a bunch of benefits to running a static IP address on Linux, and really, any other operating system.
The quickest way to achieve “Linux set static IP address” is going to be by using nmcli. This guide will show you how to quickly accomplish your Linux set static IP address concerns by showing you, step-by-step, how to set a static IP address on Linux using the command line. By utilizing the aforementioned nmcli, it takes only 3-4 minutes to quickly set a static IP address on Linux/Unix.
Table of Contents
Linux Set Static IP Address Benefits
Setting a Static IP Address Improves Network Stability
One of the biggest advantages of setting a static IP address on Linux, or any other operating system, is the network stability it provides. A static IP address never changes, unlike a dynamic IP address which will (typically) change each time your machine is restarted or turned on. By having a static IP address, you eliminate the risk of that machine being unreachable due to a misconfigured IP address.
Efficient Remote Access and Hosting
Another one of the great benefits of having a static IP address is in regards to remote access. With a static IP address, you can easily connect to your Linux machine without having to worry about changing the remote access configuration due to having a dynamic IP address. Having a static IP address ensures that your Linux machine, and any services running on it, are easily accessible, remotely!
Enhanced Security
One thing Linux is known for is there focus on security. By using a static IP address, you increase your network security greatly. By giving your Linux device a static IP address, you can create much more strict firewall rules and restrictions to protect yourself, your network and your device. This also allows for having much tighter security when authenticating with the device remotely so you can ensure only authorized users can access the Linux box.
Linux Set Static IP Address Step-by-Step Guide
This ‘Linux Set Static IP Address’ guide will be using the command line and a utility called nmcli and assumes you already have your preferred connection type set up. If you are currently using an Ethernet connection and would like to use WiFi, but are unsure of how to set that up on the command line, please refer to this Set Up WiFi on Linux Using the Command Line guide.
If you already have nmcli installed, you can skip ahead to the Linux Set Static IP Address With nmcli section.
Installing nmcli
First we will begin by installing nmcli. Start by typing the following command in your terminal:
sudo apt updateAfter a few seconds, go ahead and install the network-manager by typing the following:
sudo apt install network-managerSet Linux Static IP Address With nmcli
Now that nmcli is installed, or was already installed, we want to get a list of all of our network adapters and indentify the correct one to assign the static IP address to. Begin by typing:
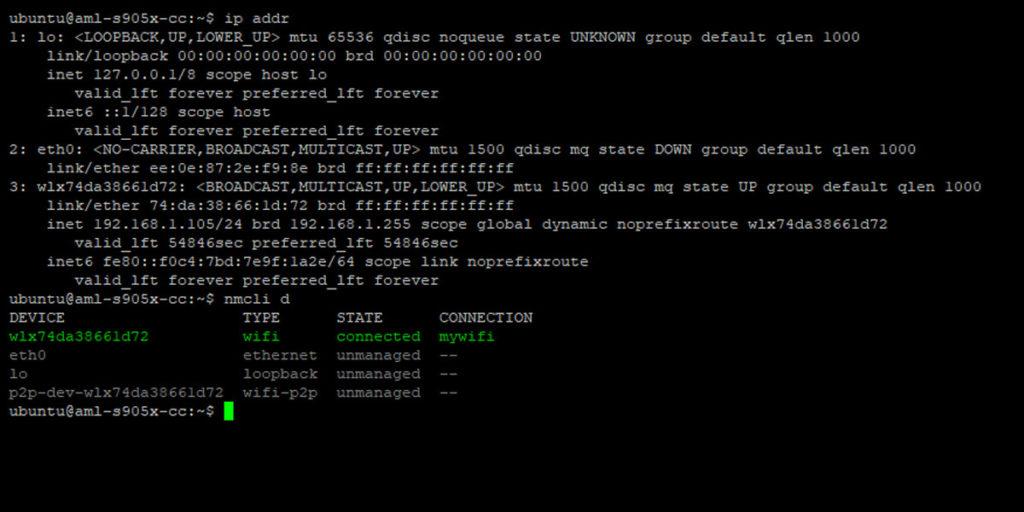
nmcli dYou should see an output similar to mine as shown below. For my device, I am using WiFi, so I want to configure the device of wlx74da38661d72 with a static IP address. Make note of whatever device you are going to be configuring as we will be using this to actually set the static IP address. Again, for my, the device is wlx74da38661d72.
DEVICE                   TYPE      STATE      CONNECTION
wlx74da38661d72          wifi      connected  mywifi
eth0                     ethernet  unmanaged  --
lo                       loopback  unmanaged  --
p2p-dev-wlx74da38661d72  wifi-p2p  unmanaged  --
Now that you have the device, we want to find the current IP address using that device so we can keep that current IP address as the IP address forever, or until we change it again in the future. Go ahead and run the following command:
ip addrUsing this command, you will get an output for all of your network adapters. Within this list, we want to identify the correct one with the device we made note of earlier. The device I am looking for, that I made note of, was wlx74da38661d72. So the information I am looking for in my output is 3: wlx74da38661d72. On that device, look for the inet IP address. Given the output below, for me, that is 192.168.1.105/24. This is my current WiFi adapter’s IP address and the IP address that I want to be static. Make note of your IP address. I will make note of 192.168.1.105/24 and use it within the next few steps.
1: lo: <LOOPBACK,UP,LOWER_UP> mtu 65536 qdisc noqueue state UNKNOWN group default qlen 1000
    link/loopback 00:00:00:00:00:00 brd 00:00:00:00:00:00
    inet 127.0.0.1/8 scope host lo
        valid_lft forever preferred_lft forever
    inet6 ::1/128 scope host
        valid_lft forever preferred_lft forever
2: eth0: <NO-CARRIER,BROADCAST,MULTICAST,UP> mtu 1500 qdisc mq state DOWN group default qlen 1000
    link/ether ee:0e:87:2e:f9:8e brd ff:ff:ff:ff:ff:ff
3: wlx74da38661d72: <BROADCAST,MULTICAST,UP,LOWER_UP> mtu 1500 qdisc mq state UP group default qlen 1000    link/ether 74:da:38:66:1d:72 brd ff:ff:ff:ff:ff:ff
    inet 192.168.1.105/24 brd 192.168.1.255 scope global dynamic noprefixroute wlx74da38661d72
        valid_lft 57829sec preferred_lft 57829sec
    inet6 fe80::f0c4:7bd:7e9f:1a2e/64 scope link noprefixroute
        valid_lft forever preferred_lft forever
Now that we have our Linux device’s IP address, we need to find our default gateway. This is your router’s IP address. You can quickly get this by using this command in your terminal:
ip route | grep defaultUsing this command, you will see the default gateway. Again, please make note of this as we will be using it in the next few steps. For me, my default gateway is 192.168.1.1.
default via 192.168.1.1 dev wlx74da38661d72 proto dhcp metric 600Now we are going to enter some commands to input our values we made note of before. First, lets set the IP address. Do this by entering the following command:
nmcli con mod <DEVICE> ipv4.addresses <YOUR_IP_ADDRESS>

Using my values, my command would look like:
nmcli con mod wlx74da38661d72 ipv4.addresses 192.168.1.105/24
Next, we will do the gateway:
nmcli con mod <DEVICE> ipv4.gateway <YOUR_DEFAULT_GATEWAY>

Using my values, my command would look like:
nmcli con mod wlx74da38661d72 ipv4.gateway 192.168.1.1
Third, we need to set the DNS in the configuration. If you are unfamiliar with DNS and unsure of what to use for this value, go ahead and use 8.8.8.8 as I do.
nmcli con mod <DEVICE> ipv4.dns <DNS_VALUE>

Using my values, my command would look like:
nmcli con mod wlx74da38661d72 ipv4.dns 8.8.8.8
The final configuration command we need to run is setting the method. Since we are wanting a static IP address, the value will be manual. Run the following command:
nmcli con mod <DEVICE> ipv4.method manual

Using my values, my command would look like:
nmcli con mod wlx74da38661d72 ipv4.method manual
After entering those 4 configuration commands, we want to make sure these values are saved and bring up our new static connection. Do that by entering:
nmcli con up <DEVICE>

Using my values, my command would look like:
nmcli con up wlx74da38661d72
After that, you’re done! You have now successfully completed your set Linux static IP address.
Final Thoughts
I hope my ‘Linux Set Static IP Address’ guide was quick and easy to follow. You should now be all set with a static IP address on your Linux device and no longer need to worry about the IP address changing every time the device boots up. If you have any questions, concerns or comments, please let me know in the comments. Have a great day and happy tinkering!
You May Also Enjoy


Leave a Reply