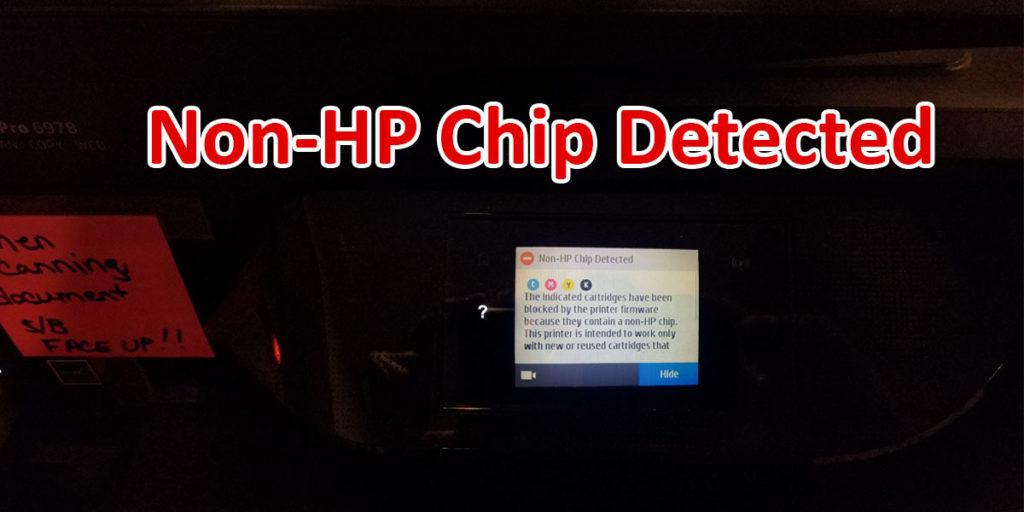
Has your HP printer all of a sudden started showing the Non HP Chip Detected error message? HP is continuously pushing new firmware updates to their printers to prevent 3rd party, or off-brand ink cartridges from working. This is forcing folks into using HP’s overpriced, and tiny ink cartridges rather than cheaper alternatives. That is nonsense. But, did you know there is a Non HP Chip Detected fix you can apply to your printer and allow it to recognize and work with these cheaper ink cartridges?
The easiest and quickest way to resolve the dreaded Non HP Chip Detected error message is to downgrade your printer’s firmware. This article will go over not only why you are suddenly getting the Non HP Chip Detected error message, but will also give you the perfect Non HP Chip Detected fix. Additionally, prevent your HP printer from ever showing this goofy message again, and continue using your off-brand ink cartridges without any fuss!
Table of Contents
This post contains affiliate links, which means I may receive a small commission, at zero cost to you, if you make a purchase through a link.
The Problem: New Printer Firmware Updates
Cut to me, on a Monday afternoon, just trying to print some color labels for my Mass MTG Tokens DIY project. Then all of a sudden, my printer gives me the dreaded ‘Non-HP Chip Detected’ error message. I have read about some folks having issues with their HP printer over the past months. Specifically, the printer refuses to use their third-party premium ink cartridge or premium toner cartridge. At this point in time, I had never ran into the issue. I figured those users must have updated their printer software and then could no longer use off-brand cartridges.
Fast-forward to today and apparently, my printer had updated without my knowledge and now my super cheap, nearly filled, 902xl Smart Ink printer cartridges no longer worked. To say I was upset is an understatement. I was fuming. After a minute or two to cool down, I started researching the problem and stumbled upon a code repository that has a bunch of old software for HP printers. It turns out, HP regularly pushes updates (I use that word loosely) for their printers, even ones that are years and years old. My printer is from like 2015, to put that into perspective for you.
These updates are only filled with new chip detection methods to stop non-HP ink cartridges from working. The updates do not contain any bug fixes, new features or improvements for the customer. How scummy is that!? These updates are literally just filled with ways to screw the customer over by forcing them into using HP-branded ink cartridges. But I digress…
Back to the code repository I found. I looked through it and found my printer’s model and downloaded it so I could ‘update’ my printer’s software to an older version. A version to back when my 902xl Smart Ink printer cartridges worked with no fuss. I then browsed my printer’s settings to make sure automatic updates were disabled. Surprise, surprise, they were not disabled. I guess that explains why my ink cartridges suddenly stopped working! After applying the printer’s downgraded software, I immediately disabled those auto updates. To hell with HP.
tldr; HP make update. Update prevent printer from working without HP branded ink cartridges. User get mad. User update printer to older version of software. User block new HP update from happening again. Third party ink cartridges work again. Profit. Yay!
The Fix: How to Bypass Non HP Chip Detected
Essentially, the way to bypass Non HP Chip Detected error message is to downgrade your printer’s firmware back to a point before HP programmed their software to recognize off-brand ink cartridges. But HP does not make this easy, after all, they want you to buy their ink cartridges and are forcing printers to only recognize their official ink cartridges. This is where finding an older version of HP’s Printer Upgrade software will be needed. By using an old version of this software, you will be able to ‘update’ (downgrade) your printer to an older version getting rid of the unsupported printer cartridge error messages!
Firmware Downgrade to Fix the Non HP Chip Detected Error
I bumped into a repository that has a large collection of HP Printer Update programs from the past. Turns out, these update programs were preserved so users could downgrade their HP printer’s firmware so the Non HP Chip Detected error is fixed. A wonderful user named Sam Easier created this repository on GitLab simply called downgrade which contains a ton of these older printer firmware ‘upgrade’ software that will restore your printer’s functionality and allow you to get rid of the Non HP Chip Detected error message. All of the following links below are from Sam Easier’s GitLab repo.
First, identify what operating system your computer uses. Then, grab the model number of your HP printer and download the correlating printer upgrade software that matches your printer’s model. Afterwards, follow the step-by-step guide (down below) to how to revert your HP printer back to a state where you are able to use off-brand ink cartridges without receiving the Non HP Chip Detected error message.
Windows HP Firmware Downgrade Software
* If any of the links below do not work, I have everything backed up on my Google Drive: Non-HP Chip Detected Downgrades. ZIP files are for Windows and DMG files are for Macs
The following links are for use on Windows machines to downgrade your HP printer’s firmware to get rid of the unsupported ink cartridge error messages.
MacOS Files HP Firmware Downgrade Software
* If any of the following links do not work, everything is backed up on my Google Drive: Non HP Chip Detected Downgrade Software. DMG files are for Macs and ZIP files are for Windows
The following links are for use on MacOS machines to downgrade your HP printer’s firmware to get rid of the unsupported ink cartridge error messages.
Step-by-Step Non HP Chip Detected Fix
Please read through the following steps carefully. This should be a relatively easy process, but you may run into issues if you don’t follow the steps carefully. Also, make sure to read the last step. After downgrading your firmware, you will need to disable automatic updates on your printer. This will stop HP from pushing firmware ‘updates’ to your machine that don’t add any value except to block new and old non HP chips from working on your printer.
Step 1: Run the HP Printer Update Program
After you have found the correct download for your printer model and the operating system you are using (downloads found above), make sure your printer is not in use. I would recommend removing the power cord from it and letting it sit for 30 seconds. After sitting without power for 30 seconds, go ahead and plug the power cord back into the machine. Let it sit for 2-3 minutes so it can finish its booting up tasks and then make sure there is nothing queued (nothing is waiting to be printed, for example).
* Please be aware, I am on Windows so all my instructions and screenshots directly reference Windows. The process on MacOS should be very similar, but the .dmg program will look different than the Windows .exe program. With that being said, the HP Printer Update program itself should be relatively straightforward, regardless of being on Windows or MacOS
Now that you have ensured your printer is not busy, go ahead and take the .zip file for Windows, or .dmg file for MacOS you downloaded from above and open it. MacOS users, scroll down just a tad.
If you are on Windows, such as myself, you just need to extract the .exe file from whichever .zip file you downloaded and run that .exe file to start the downgrader software. The update software will launch and will then begin to search for your printer.
** For Windows Users **

If you have issues running the .exe file, please try to run it as the administrator by right-clicking on it and selecting Run as administrator.
MacOS users will just need to run the .dmg file. If you are prompted with any security warnings or firewall warnings, just accept them. The update software will launch and will begin to search for your printer.
** For MacOS Users **

If you cannot open the program, or you get a message that the file is damaged, follow the instructions (very carefully!) on this video to open the app. Essentially the following steps:

    1. Download your printer's model Non-HP Chip Detected Fix Software app
    2. Mount the .dmg file
    3. Copy the Downgrader app to your desktop
    4. Open the Terminal and run the following two commands
       $ cd Desktop
       $ xattr -cr Downgrader.app
    5. Double-click the Downgrader app to open and run it
Once the Printer Update software has finished searching, you will see a list of printers the software has found. Identify the printer you wish to downgrade and check the box next to the Serial Number. Please make sure the Status says ‘Ready’. If the Status does not say ‘Ready’, there may still be something waiting to print, the printer is doing maintenance, etc. As mentioned previously, try an unplug the printer for 30 seconds and then plug it back in. This will hopefully clear any tasks the printer was doing and give a Status of ‘Ready’. If everything looks good, you can go ahead and click Update* to start the downgrade process.
* If you’d like to verify that your printer has actually updated when this is over, you can take note of the Version before clicking Update and then compare that version number to the one you’ll see after the update (firmware downgrade) has completed.
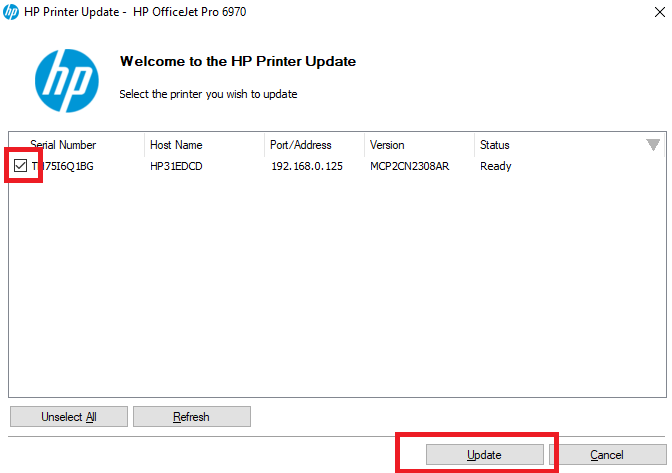
Step 2: Wait for the Firmware Update to Finish
After you have clicked the Update button, your printer will begin to update. Be patient as this process will take a bit of time. For example, it took my printer about 8 minutes to finish and show me the update complete message.
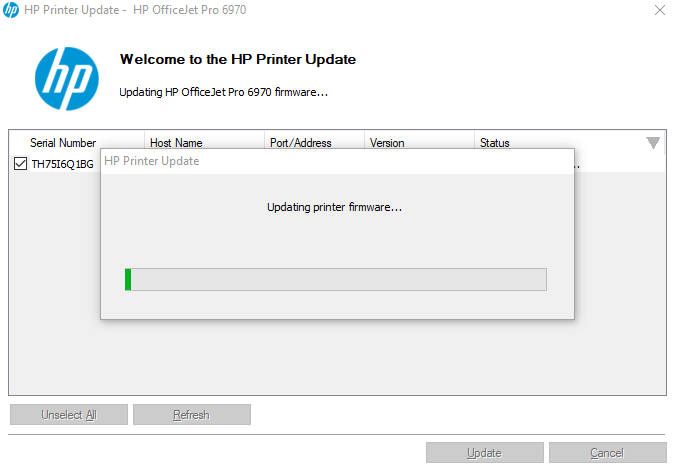
Once completed, the printer may or may no execute its printer maintenance job and then print out a status report. My printer immediately went in to maintenance mode and printed the status report. Regardless, after a bit of time, once the printer is idle, you should be completely finished with the firmware downgrade. Additionally, on the HP Printer Update software, you should now see ‘Update Successful’ on the Status column for the printer you just downgraded. If you wrote down the version number prior to running the downgrade, you can now compare the two version numbers. As you can see from the screenshots, my original, most up-to-date Version was MCP2CN2308AR and the new, downgraded Version is MCP2CN1847AR.
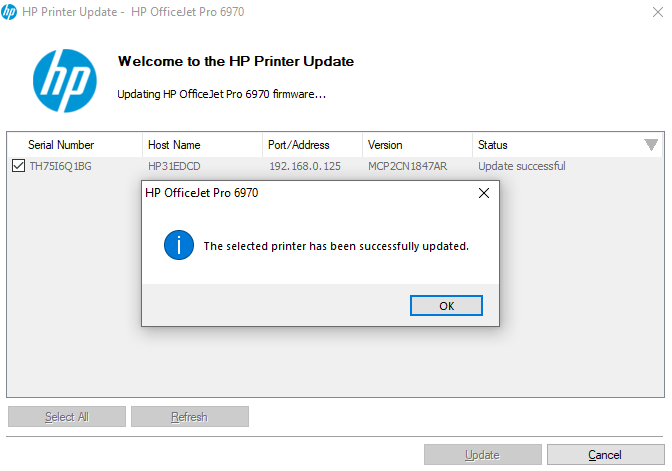
Step 2.5: Update Failed?
If the update fails, there are a few things you can try. First of all, you can just try to rerun the update. If that does not work, you can follow the directions previously mentioned in Step 1 by unplugging the printer for 30 seconds (not just powering it off) and then plugging it back in. Wait a few minutes for the printer to be completely idle and then rerun the update again.
For example, when I first tried to run the update, it failed after 5 or 6 minutes. But I thought about it and remembered, the Status for my printer said ‘Busy’ on the HP Printer Update software. I was sure that was the cause so I did the whole unplug-re-plug-in trick to try it a second time. This time, before clicking Update, the Status read as ‘Ready’ so I went ahead and sure enough, the update was successful this time around.
My takeaway from this experience is that it is key for the printer to be 100% idle and show a Status of ‘Ready’ on the HP Printer Update software for the update to be successfully applied. If, however, this still did not work, there is one last thing you can try. You can try resetting your printer to the factory defaults:
** Resetting the Printer to Factory Defaults **

WARNING: this will erase all settings and you will need to completely reconfigure your printer once finished. Also, there is no guarantee your printer's default firmware is a version that allows third party ink cartridges. This is basically a last ditch effort if the downgrade software didn't work for whatever reason. Continue on at your own risk.

While your specific printer's model may have slightly different steps, here is a general guide to resetting your printer to its default factory settings:

    1. On the printer's display panel, navigate to the settings
    2. Navigate to one of the following, depending on what option is available:
        i. Tools
        ii. Printer Maintenance
    3. Select Restore
    4. Select Restore Factory Defaults
    5. Carefully read the message that comes up to fully understand the risk.
    6. Accept the warning message
    7. The printer will restart and return to the default factory settings
    8. Preform the initial setup tasks and connect your printer to your network
    9. Verify that your non-HP ink cartridges works
        i. Print a test page
        ii. Make sure all functionality still works (scanning, printing, etc.)
    10. Continue on to the next section to disable automatic updates
Step 3: Disable Automatic Updates on your Printer
Now that you have successfully installed an older firmware version on your printer, you should now be able to use third-party or off-brand ink cartridges without any issues or any stupid error messages! Hooray! But, don’t just stop there. HP will undoubtedly release a new firmware update within a few months that will revert all of your hard work and you’ll be back to square one. The way to prevent this from happening is to disable updates to your printer. To do this, you will need to use the Printer’s touchscreen/menu.
Find where the update options are located and turn off the automatic updates. For me, that was as follows: first I went to the home screen by pressing the Home button. Then I swiped down to bring up the Settings Menu. From there, I touched the Cog Wheel icon to bring up the system settings. From there, I scrolled down to find the Printer Maintenance option and touched that option. From this menu, I found the Update the Printer button and touched on it to bring me to the update menu.
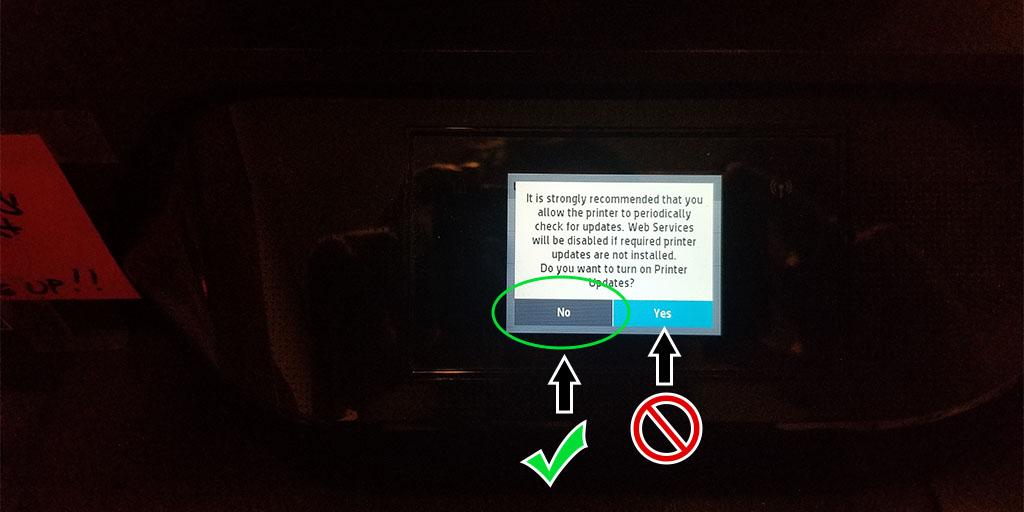
Next, I touched on the Printer Update Options which gave me a list of 3 options in regards to automatic updates. I then selected the Do Not Check option which gave me a popup message. This really made me angry because HP worded the message as if your printer would cause the end of the Universe if you didn’t allow automatic updates. On top of that, they used tricky wording to make the user select the Yes button, when in actuality, you want to select the No button. You can’t fool me, HP. Not this time! Long story short, make sure you fully read the message about disabling updates so you don’t get conned into leaving them on.
Final Thoughts
I am so glad I found, and was able to fix my HP printer to continue using off-brand printer cartridges. I have no idea how the practice of pushing updates to printers to stop them from using third party ink cartridges in even legal. It is so anti-consumer, it is not even funny. I’ll tell you this, the next time I am in the market for a printer, guess what brand I will not be purchasing? The silver lining in all of this is that if there is a will, there is a way. Bless Sam Easier’s soul for preserving these old versions of HP’s Printer Update software for all of these models.
While these files are currently hosted on Sam Easier’s GitLab repository, I have backed them up. If for whatever reason they become unavailable, I will be sure to continue to preserve these downgrade files. That way anyone in the future can update their printers to get rid of HP nonsense printer cartridge DRM. I really hope this article has helped you navigate and solve your HP printer issues. Thank you for reading, and happy printing!
You May Also Enjoy





Comments
55 responses to “Non HP Chip Detected Fix: Quick & Easy Solution”
Worked like a charm… thank you
I am clicking on the “HP OfficeJet Pro 6968” link (that is my model, I am on a Windows computer) and it downloads a zip file called “6954-downgrade” and at the top of the HP Printer Update window it says HP OfficeJet 6950. It is not showing any printers in the search after all that. Why am I not seeing my printer there? It is on, I have done the unplugging and replugging etc.
Hi Mary, the link was incorrect, but I’ve updated it. I’m sorry about that, but thank you for bringing it to my attention!
After trying several different sites and solutions, I hit on this one and it worked perfectly! Thanks!!
Hi! I have installed the corresponding downgrader for my HP 7740 but when I go in to the app and try to update the printer, under the “Status” column it says “Not applicable”. Any ideas on how to resolve this issue? Thx
So the app shows your printer and it shows the printer has a Serial Number, Host Name, IP Address and Version Number, but the status says ‘Not Applicable’?
If that is the case, that is quite strange because the app knows your printer is there and all.
The only thing I can suggest is to fully unplug it, wait 60 seconds to be sure, then plug it back in and try again.
Hi, I’m trying the link for the 7740 on my PC but I can’t even get my printer to show. Have clicked refresh. Turned the printer on and off. The same problem as Mary was having above.
Hi Kate, I saw you other comment saying it worked. What did you do differently to get it to work? When I did this to my printer, I never ran into this issue so I’m curious (and others may find it helpful too!)
You’re a godsent on my Officejet 8710. Worked a treat ….. Followed your instructions religiously. Your comment on patience very much welcomed …waiting for 8 + minutes …. would have been scary to be waiting for so long … thinking the worse, that the update may have “hung”, gone into the never never land.
Also I performed the upgrade over WiFi in a LAN environment.
Thanks you Donnie for Sharing. Community spirit is alive and well
I’m glad it worked for you! I know the feeling, just waiting hoping it didn’t freeze or anything (mine took about 8 minutes as well).
Thanks so much, This worked for my 7740. I’ll never buy another HP. This printer is the pits.
Many thanks for this!!! I tried several other things from the internet without success.
I had disabled updated with the web management tool, so also the Windows Update Tool was not allowed to downgrade. I had to go to:
Settings – Security – Administrator Settings – Printer Updates:
[X] All Firmware Updates
[ ] Only Web-Downloaded Firmware Updates
Do the update e.g. downgrade with the windows tool and then I have set again:
[ ] All Firmware Updates
Oh, that is interesting. Thank you for sharing!
Hi Donnie,
I have a HP OfficeJet Pro 6968 I have attempted to update the firmware using the Windows version. I have tried all of your suggestion even using an USB connection, but still get the update failed message.
When I attempt to use the OS version on my Mac I get the following message when I attempt to open the app,”Downgrader.app” is damaged and can’t be opened. You should eject the disk image.”
I would appreciate your help.
Fred
Hi Fred, retry the windows version by right clicking it and running as administrator and see if that works.
For the issue with the app on Mac, try going into your Security & Privacy settings and then under the General tab, select the option for ‘Anywhere’ under the ‘Allow apps downloaded from:’ section.
Let me know if either of those suggestions helped.
Hi, Donnie.
I am having the same problem as Fred.
I tried what you recommended for Fred, but MacOS 13.2.1 doesn’t have the “anywhere” option–just “App Store” and “App Store and identified developers.”
Hi Steven, I’m sorry to hear that. I don’t have a Mac so I am not quite sure how much I can help, but I did a little more research and found this video. Can you try it out and let me know if this fixes the issue?
https://www.youtube.com/watch?v=ZH8_XHzkKD4
Hi, Donnie. I tried that but it didn’t work with the Downgrader. The message in the Terminal was that “Downgrader.app: is a directory”
Hi Steven, give this a try
There should be an Open Anyway button next to this warning message. Click that button and hopefully the Downgrader app will open.
any chance you have fix firmware for an officejet pro 9015?
Sorry to say, but there isn’t a 9015 version on that downgrade GitLab repository.
My OS is MacOS Catalina Ver 10. But when I try to run the HP Update Program for my printer – HP OfficeJet Pro 6978 – I get the message that it is for Version 11 and cannot open.
Is there an earlier HP Update Program that will open with my Ver 10.
Other than automatic version updates for my OS, I’m not sure I can update from Ver 10 to 11.
Hi Jim, I am not all that familiar with MacOS, but maybe this will resolve your issue:
https://apple.stackexchange.com/questions/192533/how-to-open-applications-regardless-of-required-version
Hello,
I am having the same issue as Mary above but with my “HP OfficeJet Pro 6960” link (that is my model, I am on a Windows computer) and it downloads a zip file 6962-downgrade and at the top of the HP Printer Update window it says HP OfficeJet 6962. It is not showing any printers in the search after all that. Why am I not seeing my printer there? It is on, I have done the unplugging and replugging etc.
Hi Sarah, I doubled checked the link and it is working as expected. If you have a 6960 model printer, https://gitlab.com/downgrad/downgrade/-/raw/main/6960-downgrade.zip is the direct link.
I confirmed that the file downloaded is called 6960-downgrade.zip and the file inside that zip is called HP_OfficeJet_Pro_6960_7-17-20.exe. Also, that .exe file has HP Printer Update – HP OfficeJet Pro 6960 at the top of it as well.
Double check your printer’s version and make sure that version number matches up with the .zip file’s name. Hopefully the wrong file was accidentally downloaded and that is what the problem was.
Anything for an HP Laser Jet Pro M254dw?
Doesn’t look like it, but if any new ones show, I’ll be sure to update the list
I don’t know how an update slipped in but now I”m stuck, too.
I have the 8028 office jet pro model……will any of those other “8000” level “upgrades” work?
I’m sorry to say, but I don’t think so.
Hhi, trying to downgrade 6960 on Mac.
the downloaded 6960-downgrade.dmg MCP2C1847AR file contains a Downgrader.app – However double clicking on the app results in this error message:
“Downgrader.app” is damaged and can’t be opened. You should eject the disk image.
Hi Elle, I don’t have a Mac so I am not sure how much I can help.
Watch this video and try out what they say and see if it works. Let me know if this fixes the issue. https://www.youtube.com/watch?v=R1blDsAvTnw
FYI I had the same issue trying to use the Downgrader for an HP8740 on an iMac running 11.7.10. Good news – the workaround in the video worked for me. To summarize:
1. download the downgrader app specific to your printer
2. mount the dmg
3. copy Downgrader to your desktop
4. open terminal
$ cd Desktop
$ xattr -cr Downgrader.app
5. double-click Downgrader to run it.
in my case my printer is network connected so i specified the IP address of the printer and it installed the firmware.
now the 8740 printer utility is working again, and my scanner apps are working again.
be sure to turn off printer firmware updates on the printer.
Hi Don, I just saw your other message so I am happy to hear that you got it working. Also, thank you for the additional information, that is great!
I just finished updating our HP 6978 via my MacBook Pro. The video you mentioned worked for me IF you follow its directions. The net file HAS to be on the desktop otherwise the terminal command gives errors. https://www.youtube.com/watch?v=R1blDsAvTnw
Second, once the file is uploaded to the printer BE PATIENT. I thought the printer was froze as it went dark for some time. So I unplugged and plugged it back in but the update did not finish.
I started the update again and waited until the printer printed the test pages. Now everything just works. I had the cartridges that caused the error installed in the printer and the print report showed them as full.
Thank you for the great directions.
Hi Letty, thank you for that! I don’t have a Mac so it is really hard for me to try and help others. The fact that it worked for you is great, and hopefully it will work for other MacOS users as well.
Where are downloadable drivers for HP all in one printers. Laser jet Pro MFP 283dfw. This same issue now occurs with laser toner cartridges and I have several unused cartridges that no longer work and when one is loaded the machine no longer prints. Message reads indicated cartridges blocked for containing a non-HP chip. I have a windows machine and only see solutions for macs online.
Hi Diane, give this HP LaserJet Pro MFP M283fdw downgrade a try.
Wow! First time one of these online fixes has ever worked for me! Thank you so much!!
Worked perfectly. HP 7720. Ty 🙂
Worked just as described. Thanks for saving me $$$
WOUld like to have said it works but it did not . ON MACs one MAC pro with OS 12.7.1, the other MAC mini with Os 10.16.7. appears the update need a machine with os 11. on it as neither of mine would accept the update. suggestions?
Hi Al, can you explain what you mean by ‘accept the update’? Do you mean the app wouldn’t open or that the app opened, but the update failed to apply to your printers? If the app wouldn’t open, there are a few videos/links for how to open the app on MacOS in the comments here.
FOR MAC USERS: if the mac security tries to disable the app or tell you it is corrupted, drag it to your desktop and use this command in terminal to grant it access “xattr -cr PATH_TO_FILE_HERE” (drag the file location in there).
Example “xattr -cr /Users/JohnDoe/Desktop/Downgrader.app”. This allows you to run the app normally.
https://iboysoft.com/news/app-is-damaged-and-cannot-be-opened.html
You are a genius! Saved me from throwing my HP printer out the window. I refuse to be bullied into paying oodles of money for their ink.
Your fix link worked like a charm! Thank you!!!!!!!!!!!!
You freaking rock!
I dislike and distrust all companies that MAKE you buy their products – whole reason I got our school to drop Pitney Bowes and go with another company ($23 off brand ink cartridge vs $125 PB cartridge).
Now I can print my son’s birthday card without pulling out my hair!
Hi, Thanks for the tips – it eventually worked for me on an HP7720 and all non-proprietary items showed up and full – I was quoted 75% of the printer purchase price just to replace the HP cartridges. Keep up the good work
Hello, I have tried it and the Downgrader says “upload completed” but no new window to update ist not get open. I have a Mac and HP 7740.
Hi Marcel, I am not sure what you mean. Can you show a screenshot so I can better understand the issue?
Hi Donnie, when the uploading ist completed, how do I install the old firmware?
I cannot upload a screenshot here.
Hi Marcel, I am sorry, but I am still not understanding what the issue is. If the update was uploaded to your printer, the printer should install the old firmware. Did you check your printer’s screen once you saw the ‘upload completed’ message on your Mac? There should be some messages letting you know the printer is installing something. If you didn’t, try it again and check your printer’s screen this time. Also, it can take a long time for the firmware update to finish.
Hi Donnie, thank you for the answer. I Did not checked the printer screen. I will try it again.
I think there may be some confusion here. If the app says ‘Uploading Completed’ that should mean the old firmware was installed on your printer. Did you check if your 3rd party ink cartridges work now?
Hi Donnie, the site of the printer still show the actualy firmware.
Firmwareversion EDWINXPP1N002.2336B.00
Build-Datum 2023-09-07
and not the old one.
Hi Marcel, at this point, I am not sure how much more I can assist. I would recommend re-downloading https://gitlab.com/downgrad/downgrade/-/raw/main/7740-downgrade.dmg and try running it again. If that still doesn’t work, you can try resetting your printer to factory settings. If you do end up doing this, you may have to redo the network settings and whatnot.
Hi Donnie, I will try it next week because now I am not at home. By restore factory Defaults is the firmware also set down to factory Defaults?
I need the scanner to work with my Mac as is does before the new firmware was installed.